class: center, middle # Learn C# and ASP.NET --- # Agenda We will learn to use C# to create these types of applications: * Web applications * Command line applications * REST API applications --- ### Introduction C# is based on .NET It started in 2002 with .NET framework * **.NET Framework:** The original Windows-only framework for building applications. * **.NET Core:** A cross-platform, open-source version of .NET designed for modern app development. * **ASP.NET:** A framework for building web applications, evolving significantly with the introduction of ASP.NET Core. * **Unified .NET:** Starting from .NET 5, Microsoft has aimed to unify the various .NET implementations into a single platform. Current version is .NET 10.0. A new major version is released once a year in November. Long Term Support (**LTS**) releases in .NET Core provide extended support for **three years**. LTS versions are released every two years in even-numbered versions (e.g., .NET 6, .NET 8 and .NET 10). Standard Term Support (**STS**) versions are supported for **18 months** and are released in odd-numbered versions (e.g., .NET 7, .NET 9). There are no differences in type of new functionality or stability between LTS and STS. --- ### The history of .NET **1996:** The first version of Visual Basic is released, which would later influence .NET languages. **2002:** .NET Framework 1.0 is officially released. Introduction of ASP.NET for web applications. **.NET Framework 4.8.1** is the last version of .NET framework. Was released August 9, 2022. **2016:** .NET Core 1.0 is released, marking the start of a cross-platform, open-source version of .NET. - ASP.NET Core 1.0 is released, with a redesigned framework for building web applications. **2020:** .NET 5.0 is released, unifying .NET Framework and .NET Core version numbering. C#, F#, PowerShell and VB programming languages are based on .NET In Equinor, both `.NET` and `C#` are registed in the Techradar with `Adopt` status. --- C# applications will normally require that the .NET runtime is installed on the machine. (It is also possible to compile to native code so the runtime is not required.) If you want to **write** a C# program you need to have the .NET **SDK** installed. With the SDK installed you only need a text editor to create applications. This is supported on Windows, Linux and Mac. --- ### Visual Studio Using Visual Studio 2026 to build applications provides the best user experience and support. To get a license you must apply in AccessIT for "MICROSOFT VISUAL STUDIO PROFESSIONAL WITH MSDN". This costs kr. 2300.- yearly for Enterprises. When you have the license approved, you go to https://visualstudio.microsoft.com/downloads/ and download the "Professional" edition. Preferably do this on a PC with Equinor Developer profile. For home/private use, choose the "Community" edition that is still the full version but is free for private and small companies to use. Visual Studio is only supported on Windows. More info: [visualstudio.microsoft.com](https://visualstudio.microsoft.com/) During the installation, choose these two options: 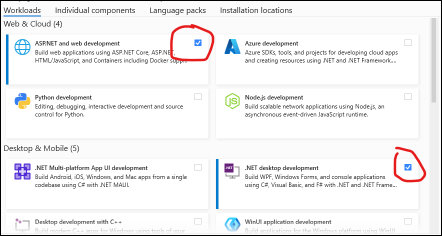 --- ### Visual Studio Code With Visual Studio Code you need to install the .NET SDK manually: https://dotnet.microsoft.com/en-us/download Then you need to install the Visual Studio Code Extension "C# Dev Kit". (this one seems to require a Visual Studio lisence) As an alternative just install the C# extention. This is supported on Windows, Linux and Mac. If you create the C# program on your local machine, you need to have the .NET SDK installed. If you connect to the Linux machine and work with your program remotely, you don't need .NET SDK locally. The .NET SDK is already installed on our training server. Click on the blue >< symbol at the bottom left in Visual Studio Code to 'Open a Remote Window'. (I guess you need the 'Remote - SSH' extention) `ssh-copy-id -i pubkey bruker@server` (this command is only on Mac) Or: From your Linux home directory: ```bash mkdir .ssh cd .ssh micro authorized_keys ``` Paste in the public key, Ctrl-s, Ctrl-q ```bash chmod 700 ~/.ssh chmod 600 ~/.ssh/authorized_keys ``` If you don't have an ssh key (on your PC): `ssh-keygen -t ed25519 -C "your_email@example.com"` --- ### JetBrains Rider A solid IDE for .NET JetBrains Rider is a cross-platform IDE, providing a seamless development experience across Windows, macOS, and Linux. https://www.jetbrains.com/rider/ Free for non-commercial use. Also available in AccessIT with a yearly cost of kr. 6500,- --- ### Install .NET SDK and ASP.NET Core on Linux Note the debian version here. Use '12' if you have debian version 12: ```bash wget https://packages.microsoft.com/config/debian/13/packages-microsoft-prod.deb -O packages-microsoft-prod.deb dpkg -i packages-microsoft-prod.deb rm packages-microsoft-prod.deb apt update apt install aspnetcore-runtime-10.0 ``` Or this if you need the SDK version: ```bash apt install dotnet-sdk-10.0 ``` With the SDK installed you can use a Linux server to write, debug, compile and run C# command line programs and ASP.NET Web applications. --- ### Application templates There are many templates that can be used to start creating a new application. We will use these: * ASP.NET Core Web App (Razor Pages) * Console App * ASP.NET Core Web API --- ### Our first program This will be a Command line application ### An Introduction to C#. C# (pronounced "C sharp") is a modern, object-oriented programming language developed by Microsoft. It's widely used for building a variety of applications, including desktop programs, web services, mobile apps, and video games. A key concept in C# is object-oriented programming (OOP), which organizes software design around data, or objects, rather than functions and logic. ### Creating a Console Application A console application is a simple command-line program that runs from a terminal window. It's a great way to start with C# because it focuses on the core language features without the complexity of a graphical user or web interface. --- Every C# console application has a main entry point, the ` Main ` method, which is where the program execution begins. ### Understanding Classes: Fields, Properties, and Methods A class is the fundamental building block of an object-oriented program. Think of it as a blueprint for creating objects. It defines the data and behavior that an object will have. * **Fields:** These are variables within a class that store data. They represent the characteristics or state of an object. Fields are typically declared as private to restrict direct access from outside the class. * **Properties:** These are special members that provide a flexible and controlled way to access a class's private fields. A property has a get accessor (to read the value) and a set accessor (to write the value). Using properties allows you to implement validation or other logic when data is being read or written, which is considered a best practice in C#. * **Methods:** These are blocks of code that perform actions or behaviors. They are the functions of the class. Methods can use or modify the data stored in the class's fields or properties. For example, a Book class might have a method called DisplayBookInfo() that prints the book's title and author to the console. --- ```c# // File: Program.cs using System; // This is the main class for our console application. // The Main method is the entry point of the program. public class Program { // The Main method where program execution begins. public static void Main(string[] args) { // 1. Create an instance (an object) of the Book class. // We are using the 'new' keyword to create an object from the blueprint. Book myBook = new Book(); // 2. Set the value of the Title property. // This uses the 'set' accessor of the Title property. myBook.Title = "The Lord of the Rings"; // 3. Set the value of the Author property. // This uses the 'set' accessor of the Author property. myBook.Author = "J.R.R. Tolkien"; // 4. Call a method on the myBook object. // This executes the code within the DisplayBookInfo method. myBook.DisplayBookInfo(); } } ``` --- ```c# // This is our blueprint (the class) for a Book object. public class Book { // Fields: These are the private data members of our class. // They are typically prefixed with an underscore to denote that they are private. private string _title; private string _author; // Properties: These provide controlled access to our private fields. // The 'get' accessor reads the value, and the 'set' accessor writes it. public string Title { get { return _title; } set { _title = value; } } public string Author { get { return _author; } set { _author = value; } } // Methods: These define the behaviors of our class. // This method displays the book's information. public void DisplayBookInfo() { // We can access the private fields and public properties within the class. // We'll use the properties here for good practice. Console.WriteLine($"Title: {Title}"); Console.WriteLine($"Author: {Author}"); } } /* Expected Output: Title: The Lord of the Rings Author: J.R.R. Tolkien */ ``` --- ### Or, do the same thing more simple: ```c# Book myBook = new Book(); myBook.Title = "The Lord of the Rings"; myBook.Author = "J.R.R. Tolkien"; myBook.DisplayBookInfo(); public class Book { public string Title; public string Author; public void DisplayBookInfo() { Console.WriteLine($"Title: {Title}"); Console.WriteLine($"Author: {Author}"); } } ``` ### Or, just define the methods static in a class: ```c# Book.DisplayBookInfo("The Lord of the Rings", "J.R.R. Tolkien"); public class Book { public static void DisplayBookInfo(string Title, string Author) { Console.WriteLine($"Title: {Title}"); Console.WriteLine($"Author: {Author}"); } } ``` --- ### Introduction to C#. Focus: Build foundational programming skills in C#. **Topics:** 1. Getting Started with C# and .NET. 2. Variables, Data Types, and Operators. 3. Control Structures (if, loops, switch). 4. Methods and Functions. 5. Arrays and Collections. --- ### Create a console application that reads met.no API and display the result * Start Visual Studio * Select "Create a new project" * Choose template "Console App" * Select a name, i.e. Learning2 * Set "Location" to C:\Appl\Git * Mark "Place solution and project in same directory" * Framework: .NET 10.0 and remove all checkmarks on this page. * "Create" In the `Solution Explorer` window, under Solution 'Trainning2', right-click on Trainning2 project. Choose `Edit project file` Change `<Nullable>enable</Nullable>` to `<Nullable>disable</Nullable>` Under the main menu `Project` choose `Manage NuGet Packages...` Under "Browse" seach for 'restsharp' and install `RestSharp` Also install these: * Newtonsoft.Json * Dapper * Microsoft.Data.SqlLite Save Training2.csproj (or save all files icon at the top) --- ### In a terminal on Linux ssh shortname@4.177.20.49 In this exercise we will use `micro` at the text editor. ```bash cd dotnet new console -o training2 cd training2 dotnet run micro Program.cs dotnet add package Newtonsoft.Json dotnet add package RestSharp micro training2.csproj dotnet run # compile and run # if you want to create a compiled version: dotnet publish -c "Release" -o "bin\publish" cd bin/publish ./training2 ``` When using `micro` as text editor and copy/paste don't work properly, edit this file (from your home directory): `micro .config/micro/settings.json` and add this line: `{"clipboard": "terminal"}` When editing training2.csproj, change `<Nullable>enable</Nullable>`' to `<Nullable>disable</Nullable>` --- ```c# using System; using RestSharp; using Newtonsoft.Json; Console.WriteLine("Hello, World!"); var client = new RestClient("https://api.met.no"); var request = new RestRequest("/weatherapi/locationforecast/2.0/compact"); request.AddHeader("User-Agent", "peweWeatherApp/1.0"); request.AddParameter("lat", "58.8489"); request.AddParameter("lon", "5.7173"); var response = await client.GetAsync(request); if (response.IsSuccessful) { Console.WriteLine("Weather Data:"); //Console.WriteLine(response.Content); dynamic weatherData = JsonConvert.DeserializeObject(response.Content); foreach (var weather in weatherData.properties.timeseries) { Console.WriteLine($"{weather.time}: {weather.data.instant.details.air_temperature + "°C",-6} {weather.data.next_1_hours?.summary?.symbol_code,-31} {weather.data.next_6_hours?.summary?.symbol_code,-31} {weather.data.next_12_hours?.summary?.symbol_code,-31}"); } } else { Console.WriteLine($"Error: {response.StatusCode}"); Console.WriteLine(response.ErrorMessage); } ``` [met.no api documentation](https://api.met.no/weatherapi/locationforecast/2.0/documentation]) --- A longer version can be found [here](weatherforecast.html), where we store a list of locations in a database and can choose weather forecast from this list. And another version [here](weatherforecast2.html) where we use `class` and `record` to define data objects instead of the `dynamic` type. In these versions we use a database to store location information. Then these two packages needs to be installed: ```bash dotnet add package Microsoft.Data.Sqlite dotnet add package Dapper ``` --- #### Topic 1: Getting Started with C# and .NET C# (pronounced "C Sharp") is a versatile, object-oriented programming language created by Microsoft in 2000. It's part of the .NET ecosystem, which provides tools, libraries, and runtime for building applications. .NET is cross-platform (Windows, macOS, Linux) and supports various app types: console, web, mobile, games, etc. Key features of C#: - **Type-Safe:** Helps catch errors at compile-time (e.g., you can't assign a string to an integer variable without explicit conversion). - **Modern Syntax:** Similar to Java or C++, but with conveniences like automatic memory management (garbage collection). - **Versatile:** Used for everything from enterprise software to Unity game development. .NET Structure: - **CLR (Common Language Runtime):** Manages execution, memory, and security. - **BCL (Base Class Library):** Pre-built code for common tasks (e.g., file I/O, networking). - **SDK vs. Runtime:** SDK for development; runtime for running apps. Common Pitfalls: - Forgetting semicolons (;) at the end of statements. - Case sensitivity: C# is case-sensitive (e.g., `console` vs. `Console`). - Namespaces: Organize code; `using System;` imports common utilities. --- #### Topic 2: Variables, Data Types, and Operators Variables store data in memory. Declare them with a type, name, and optional initial value: `type name = value;`. Primitive Data Types: - **Numeric:** `int` (whole numbers, e.g., 42), `double` (decimals, e.g., 3.14), `long` (larger integers), `float` (single-precision decimal), `decimal` (high-precision for money). - **Text:** `string` (e.g., "Hello"), `char` (single character, e.g., 'A'). - **Boolean:** `bool` (true/false). - **Others:** `byte`, `short`, etc., for specific ranges. Reference Types: Point to data (e.g., objects, arrays—covered later). Unlike primitives, they can be null. Operators: - **Arithmetic:** `+`, `-`, `*`, `/`, `%` (modulo for remainder). - **Assignment:** `=`, `+=`, `-=`, etc. - **Comparison:** `==`, `!=`, `>`, `<`, `>=`, `<=`. - **Logical:** `&&` (and), `||` (or), `!` (not). - **String Concatenation:** Use `+` or string interpolation `$"Value: {var}"`. Type Conversion: - Implicit: Automatic (e.g., int to double). - Explicit: Casting `(int)3.14` or methods like `Convert.ToInt32()`. - Parsing: `int.Parse("42")` for strings to numbers (handle errors with `TryParse`). Constants: `const int MaxValue = 100;` (can't change). --- **Expanded Code Examples:** - Variables and Arithmetic: ```c# int age = 30; // Integer double height = 1.75; // Decimal string name = "Alice"; bool is Employed = true; int sum = age + 10; double bmi = 70 / (height * height); // Weight in kg / height squared string greeting = $"Hello, {name}! You are {age} years old."; Console.WriteLine(greeting); Console.WriteLine($"BMI: {bmi:F2}"); // Format to 2 decimal places ``` - Operators and Conversion: ```c# int x = 10, y = 3; Console.WriteLine(x % y); // 1 (remainder) bool isAdult = age >= 18 && isEmployed; Console.WriteLine(isAdult); // true string input = "25"; int parsedAge = int.Parse(input); double casted = (double)parsedAge; ``` --- #### Topic 3: Control Structures (if, loops, switch) **Detailed Lecture Notes:** Control structures direct program flow. - **If-Else:** For decisions. - Syntax: `if (condition) { } else if (other) { } else { }` - Use ternary for simple: `string result = age >= 18 ? "Adult" : "Minor";` - **Loops:** - **For:** Known iterations: `for (int i = 0; i < 10; i++) { }` - **While:** Condition-checked before: `while (condition) { }` - **Do-While:** Checked after: `do { } while (condition);` - **Foreach:** For collections (later). - **Switch:** For multiple cases: `switch (value) { case 1: ... break; default: ... }` - Supports patterns in newer C# (e.g., switch expressions). Break/Continue: `break` exits loop; `continue` skips iteration. --- **Expanded Code Examples:** - If-Else with User Input: ```c# Console.Write("Enter age: "); int age = int.Parse(Console.ReadLine()); if (age < 18) { Console.WriteLine("Minor"); } else if (age >= 65) { Console.WriteLine("Senior"); } else { Console.WriteLine("Adult"); } ``` In C#, you can use the ternary operator to write an if-else statement in a single line. The syntax is: condition ? value_if_true : value_if_false; ```c# int number = (x > 10) ? 1 : 0; Console.WriteLine(x > 10 ? "Greater than 10" : "10 or less"); string result = (x > 10) ? "Greater" : (x == 10) ? "Equal" : "Less"; // nested ``` --- - Loops: ```c# // For loop: Print even numbers for (int i = 0; i <= 10; i += 2) { Console.WriteLine(i); } // While: Countdown int count = 5; while (count > 0) { Console.WriteLine(count); count--; } // Switch: Day of week int day = 3; // Assume 1=Mon, 7=Sun switch (day) { case 1: case 2: case 3: case 4: case 5: Console.WriteLine("Weekday"); break; case 6: case 7: Console.WriteLine("Weekend"); break; default: Console.WriteLine("Invalid"); break; } ``` --- #### Topic 4: Methods and Functions **Detailed Lecture Notes:** Methods are reusable code blocks. They promote DRY (Don't Repeat Yourself). - Syntax: `access returnType Name(parameters) { body }` - Access: `public`, `private`, etc. (default private). - Return: `void` (none) or type (e.g., `int`). - Parameters: Inputs, e.g., `int Add(int a, int b) { return a + b; }` - Overloading: Same name, different params. - Calling: `result = Add(5, 3);` - Scope: Variables local to method. - Ref/Out Params: For modifying inputs (e.g., `ref int x`). - Default Params: `int Multiply(int a, int b = 2) { }` Static vs. Instance: Static belongs to class; instance to object (OOP preview). --- **Expanded Code Examples:** - Basic Method: ```c# static int Add(int a, int b) { return a + b; } // Usage int sum = Add(5, 3); Console.WriteLine(sum); // 8 ``` - With Ref: ```c# static void Increment(ref int num) { num++; } int value = 10; Increment(ref value); Console.WriteLine(value); // 11 ``` - Overloaded: ```c# static string Greet(string name) { return $"Hello, {name}"; } static string Greet(string name, int age) { return $"Hello, {name}. You are {age}."; } ``` --- #### Topic 5: Arrays and Collections **Detailed Lecture Notes:** Store multiple values. - **Arrays:** Fixed-size: `int[] numbers = new int[5];` or `int[] nums = {1,2,3};` - Access: `numbers[0] = 10;` (0-indexed). - Length: `numbers.Length`. - **Collections:** Dynamic. - **List<T>:** `List<int> list = new List<int>(); list.Add(1);` - **Dictionary<TKey, TValue>:** Key-value pairs: `Dictionary<string, int> ages = new(); ages["Alice"] = 30;` - Others: Queue, Stack, HashSet (unique items). Iteration: Use loops or `foreach (var item in collection) { }` --- **Expanded Code Examples:** - Array: ```c# string[] fruits = { "Apple", "Banana", "Cherry" }; for (int i = 0; i < fruits.Length; i++) { Console.WriteLine(fruits[i]); } ``` - List: ```c# using System.Collections.Generic; List<double> scores = new List<double> { 85.5, 92.0 }; scores.Add(78.3); scores.Remove(92.0); // Removes first occurrence foreach (double score in scores) { Console.WriteLine(score); } ``` - Dictionary: ```c# Dictionary<string, string> capitals = new() { { "USA", "Washington" }, { "France", "Paris" } }; capitals["Japan"] = "Tokyo"; foreach (var pair in capitals) { Console.WriteLine($"{pair.Key}: {pair.Value}"); } ``` --- ### Common String Manipulation Functions in C#. Strings are immutable in C#, meaning once a string object is created, its value cannot be changed. Any operation that appears to modify a string actually creates a new string object. Let's dive into the most frequently used functions: #### 1. `string.Length` (Property) While not a function, `Length` is a crucial property that returns the number of characters in a string. ```c# string message = "Hello, C#!"; int length = message.Length; // length will be 10 Console.WriteLine($"The length of the string is: {length}"); ``` --- #### 2. `string.Contains(string value)` Checks if a string contains a specified substring. It returns `true` if the substring is found, otherwise `false`. It's case-sensitive. ```c# string sentence = "The quick brown fox jumps over the lazy dog."; bool containsFox = sentence.Contains("fox"); // true bool containsCat = sentence.Contains("cat"); // false bool containsQuick = sentence.Contains("Quick"); // false (case-sensitive) Console.WriteLine($"Contains 'fox': {containsFox}"); Console.WriteLine($"Contains 'cat': {containsCat}"); Console.WriteLine($"Contains 'Quick': {containsQuick}"); ``` --- #### 3. `string.IndexOf(string value)` Returns the zero-based index of the first occurrence of a specified substring within the string. If the substring is not found, it returns `-1`. It's case-sensitive. There are also overloads to specify a start index or the number of characters to search. ```c# string text = "C# is a powerful and versatile language."; int index = text.IndexOf("powerful"); // index will be 8 int notFound = text.IndexOf("python"); // notFound will be -1 Console.WriteLine($"Index of 'powerful': {index}"); Console.WriteLine($"Index of 'python': {notFound}"); // Searching from a specific index int secondA = text.IndexOf('a', 10); // Finds 'a' in 'and' Console.WriteLine($"Index of 'a' after index 10: {secondA}"); ``` --- #### 4. `string.LastIndexOf(string value)` Similar to `IndexOf`, but it returns the zero-based index of the last occurrence of a specified substring. ```c# string path = "C:\\Users\\Petter\\Documents\\Project\\file.cs"; int lastBackslash = path.LastIndexOf('\\'); // lastBackslash will be 33 Console.WriteLine($"Last index of '\\': {lastBackslash}"); ``` --- #### 5. `string.StartsWith(string value)` and `string.EndsWith(string value)` Check if a string begins or ends with a specified substring, respectively. Both are case-sensitive. ```c# string fileName = "report.pdf"; bool startsWithReport = fileName.StartsWith("report"); // true bool endsWithPdf = fileName.EndsWith(".pdf"); // true bool startsWithDoc = fileName.StartsWith("doc"); // false Console.WriteLine($"Starts with 'report': {startsWithReport}"); Console.WriteLine($"Ends with '.pdf': {endsWithPdf}"); ``` --- #### 6. `string.Substring(int startIndex)` and `string.Substring(int startIndex, int length)` Extracts a substring from a string. * `Substring(startIndex)`: Extracts from `startIndex` to the end of the string. * `Substring(startIndex, length)`: Extracts `length` characters starting from `startIndex`. ```c# string url = "https://www.example.com/products/item123"; string domain = url.Substring(8, 17); // "www.example.com" // Extracting everything after the last slash int lastSlashIndex = url.LastIndexOf('/'); string itemCode = url.Substring(lastSlashIndex + 1); // "item123" Console.WriteLine($"Domain: {domain}"); Console.WriteLine($"Item Code: {itemCode}"); ``` --- #### 7. `string.Replace(char oldChar, char newChar)` and `string.Replace(string oldValue, string newValue)` Returns a new string where all occurrences of a specified character or substring are replaced with another. ```c# string data = "Hello World!"; string modified1 = data.Replace('o', '0'); // "Hell0 W0rld!" string modified2 = data.Replace("World", "C#"); // "Hello C#! " Console.WriteLine($"Replaced 'o' with '0': {modified1}"); Console.WriteLine($"Replaced 'World' with 'C#': {modified2}"); ``` --- #### 8. `string.ToLower()` and `string.ToUpper()` Return a new string with all characters converted to lowercase or uppercase, respectively. Useful for case-insensitive comparisons. ```c# string original = "MixEd CaSe StRiNg"; string lower = original.ToLower(); // "mixed case string" string upper = original.ToUpper(); // "MIXED CASE STRING" Console.WriteLine($"Lowercase: {lower}"); Console.WriteLine($"Uppercase: {upper}"); // Case-insensitive comparison using ToLower() string input = "apple"; string storedValue = "Apple"; if (input.ToLower() == storedValue.ToLower()) { Console.WriteLine("The strings are equal (case-insensitive)."); } ``` --- #### 9. `string.Trim()`, `string.TrimStart()`, `string.TrimEnd()` Return a new string with all leading and/or trailing whitespace characters removed. * `Trim()`: Removes leading and trailing whitespace. * `TrimStart()`: Removes leading whitespace. * `TrimEnd()`: Removes trailing whitespace. ```c# string padded = " Some text with spaces "; string trimmed = padded.Trim(); // "Some text with spaces" string trimmedStart = padded.TrimStart(); // "Some text with spaces " string trimmedEnd = padded.TrimEnd(); // " Some text with spaces" Console.WriteLine($"Original: '{padded}'"); Console.WriteLine($"Trimmed: '{trimmed}'"); Console.WriteLine($"TrimmedStart: '{trimmedStart}'"); Console.WriteLine($"TrimmedEnd: '{trimmedEnd}'"); ``` --- #### 10. `string.Split(params char[] separator)` and `string.Split(string[] separator, StringSplitOptions options)` Divides a string into an array of substrings based on specified delimiter characters or strings. `StringSplitOptions.RemoveEmptyEntries` can be used to exclude empty strings from the result. ```c# string csvData = "apple,banana,,orange"; string[] fruits = csvData.Split(','); // {"apple", "banana", "", "orange"} string[] fruitsNoEmpty = csvData.Split(',', StringSplitOptions.RemoveEmptyEntries); // {"apple", "banana", "orange"} Console.WriteLine("Fruits (with empty entries):"); foreach (string fruit in fruits) { Console.WriteLine($"- '{fruit}'"); } Console.WriteLine("Fruits (without empty entries):"); foreach (string fruit in fruitsNoEmpty) { Console.WriteLine($"- '{fruit}'"); } // Splitting by multiple delimiters string sentence = "Hello-World;This_is_a test."; char[] delimiters = { '-', ';', '_' }; string[] words = sentence.Split(delimiters, StringSplitOptions.RemoveEmptyEntries); Console.WriteLine("Words:"); foreach (string word in words) { Console.WriteLine($"- '{word}'"); } ``` --- #### 11. `string.Join(string separator, params string[] value)` and `string.Join(string separator, IEnumerable<string> value)` Concatenates the elements of a string array or `IEnumerable<string>` using a specified separator between each element. This is the inverse of `Split()`. ```c# string[] parts = { "first", "second", "third" }; string joined = string.Join(" - ", parts); // "first - second - third" List<string> shoppingList = new List<string> { "Milk", "Eggs", "Bread" }; string listItems = string.Join(", ", shoppingList); // "Milk, Eggs, Bread" Console.WriteLine($"Joined string: {joined}"); Console.WriteLine($"Shopping List: {listItems}"); ``` --- #### 12. `string.IsNullOrEmpty(string value)` and `string.IsNullOrWhiteSpace(string value)` These static methods are crucial for validating string inputs. * `IsNullOrEmpty`: Returns `true` if the string is `null` or an empty string (`""`). * `IsNullOrWhiteSpace`: Returns `true` if the string is `null`, an empty string, or consists only of whitespace characters. This is generally preferred for user input validation. ```c# string s1 = null; string s2 = ""; string s3 = " "; string s4 = "hello"; Console.WriteLine($"s1 IsNullOrEmpty: {string.IsNullOrEmpty(s1)}"); // true Console.WriteLine($"s2 IsNullOrEmpty: {string.IsNullOrEmpty(s2)}"); // true Console.WriteLine($"s3 IsNullOrEmpty: {string.IsNullOrEmpty(s3)}"); // false Console.WriteLine($"s4 IsNullOrEmpty: {string.IsNullOrEmpty(s4)}"); // false Console.WriteLine($"s1 IsNullOrWhiteSpace: {string.IsNullOrWhiteSpace(s1)}"); // true Console.WriteLine($"s2 IsNullOrWhiteSpace: {string.IsNullOrWhiteSpace(s2)}"); // true Console.WriteLine($"s3 IsNullOrWhiteSpace: {string.IsNullOrWhiteSpace(s3)}"); // true Console.WriteLine($"s4 IsNullOrWhiteSpace: {string.IsNullOrWhiteSpace(s4)}"); // false ``` --- #### 13. String Interpolation (`$""`) and `string.Format()` While not functions in the traditional sense, these are powerful ways to construct strings dynamically. #### String Interpolation (`$""`) (Recommended for modern C#) Allows you to embed expressions directly into a string literal by prefixing the string with `$`. ```c# string name = "Petter"; int age = 30; string greeting = $"Hello, {name}! You are {age} years old."; Console.WriteLine(greeting); // "Hello, Petter! You are 30 years old." double price = 12.345; string formattedPrice = $"The price is {price:C}"; // "The price is $12.35" (depends on culture) Console.WriteLine(formattedPrice); ``` #### `string.Format(string format, params object[] args)` Uses placeholders (`{0}`, `{1}`, etc.) to insert values into a string. Still useful for certain scenarios, especially with older codebases or when working with `IFormatProvider`. ```c# string product = "Laptop"; decimal cost = 999.99m; string orderSummary = string.Format("Your order: {0} for {1:C}", product, cost); Console.WriteLine(orderSummary); // "Your order: Laptop for $999.99" ``` --- ### Advanced C# Concepts Focus: Modern features for efficient coding. **Topics:** 1. LINQ (Language Integrated Query). 2. Async/Await for Asynchronous Programming. 3. Generics and Nullable Types. **Lecture Notes:** - LINQ for querying data collections like arrays or lists. - Async for non-blocking operations, useful in web apps. **Code Example: LINQ Query** ```c# using System; using System.Linq; using System.Collections.Generic; List<string> names = new List<string> { "Alice", "Bob", "Charlie" }; var shortNames = names.Where(n => n.Length < 5); foreach (var name in shortNames) { Console.WriteLine(name); // Outputs: Bob } ``` --- #### Topic 1: LINQ (Language Integrated Query) LINQ is a set of extensions for querying data collections (e.g., lists, arrays, XML, databases) using a SQL-like syntax integrated into C#. It unifies data access across sources, making code readable and concise. Introduced in C# 3.0, it's built on extension methods and lambdas (covered next). Key Concepts: - **Queryable Sources:** Any IEnumerable<T> (e.g., List<T>, array) or IQueryable<T> (for databases). - **Query Syntax vs. Method Syntax:** Query is declarative (SQL-like); method is fluent (chained methods). Both compile to the same IL code. - **Deferred Execution:** Queries don't run until enumerated (e.g., via foreach or ToList()). Use ToList()/ToArray() for immediate execution. - **Standard Query Operators:** Categories like filtering (Where), projection (Select), ordering (OrderBy), grouping (GroupBy), joining (Join), aggregation (Sum, Count, Max). - **Providers:** LINQ to Objects (in-memory), LINQ to SQL/XML/Entities (external data). Analogy: LINQ is like querying a database, but for any data in code—filter employees like "SELECT * FROM Employees WHERE Age > 30". --- **Expanded Code Examples:** First, setup sample data: ```c# using System.Collections.Generic; public class Employee { public string Name { get; set; } public int Age { get; set; } public string Department { get; set; } public decimal Salary { get; set; } } List<Employee> employees = new List<Employee> { new Employee { Name = "Alice", Age = 30, Department = "HR", Salary = 50000 }, new Employee { Name = "Bob", Age = 25, Department = "IT", Salary = 60000 }, new Employee { Name = "Charlie", Age = 35, Department = "IT", Salary = 70000 }, new Employee { Name = "David", Age = 28, Department = "HR", Salary = 55000 }, new Employee { Name = "Eve", Age = 40, Department = "Finance", Salary = 80000 } }; ``` --- - Query Syntax Basics (Filtering, Projection, Ordering): ```c# using System.Linq; using System; // Filter ages > 30, project names, order by name var query = from emp in employees where emp.Age > 30 orderby emp.Name select emp.Name; // Deferred: Runs here foreach (var name in query) { Console.WriteLine(name); // Charlie, Eve } ``` - Method Syntax Equivalent: ```c# var methodQuery = employees .Where(emp => emp.Age > 30) .OrderBy(emp => emp.Name) .Select(emp => emp.Name); foreach (var name in methodQuery) { Console.WriteLine(name); } ``` --- - Grouping and Aggregation: ```c# // Group by department, average salary var grouped = from emp in employees group emp by emp.Department into deptGroup select new { Department = deptGroup.Key, AvgSalary = deptGroup.Average(e => e.Salary), Count = deptGroup.Count() }; foreach (var group in grouped) { Console.WriteLine($"{group.Department}: Avg {group.AvgSalary:C}, Count {group.Count}"); // HR: Avg $52,500.00, Count 2 // IT: Avg $65,000.00, Count 2 // Finance: Avg $80,000.00, Count 1 } ``` --- - Joining (e.g., with another list): ```c# List<string> departments = new List<string> { "HR", "IT", "Finance" }; // Dummy for join var joined = from emp in employees join dept in departments on emp.Department equals dept select new { emp.Name, Dept = dept }; // Method: employees.Join(departments, emp => emp.Department, dept => dept, (emp, dept) => new { emp.Name, Dept = dept }); ``` - Advanced: Let Clause, Into, Distinct, Any/All: ```c# // Let for intermediate, distinct ages, check if any >50 var advanced = from emp in employees let fullInfo = $"{emp.Name} ({emp.Age})" where emp.Salary > 60000 orderby emp.Salary descending select fullInfo into infos where infos.Contains("3") // Filter after select select infos.Distinct(); bool hasSenior = employees.Any(emp => emp.Age > 50); // false (if one or more satisfy criteria) bool allAdult = employees.All(emp => emp.Age >= 18); // true (if all elements satisfy criteria) ``` --- #### Topic 2: Async/Await for Asynchronous Programming Async enables non-blocking code for I/O-bound tasks (e.g., web requests, file reads). Use `async` methods returning Task/Task<T>, `await` to pause without blocking. - **Task:** Represents async op: Task.Run(() => { }); - **await:** Unwraps Task, handles exceptions. **Expanded Code Examples:** - Basic Async: ```c# using System.Threading.Tasks; async Task<string> FetchDataAsync() { await Task.Delay(1000); // Simulate delay return "Data fetched"; } string data = await FetchDataAsync(); Console.WriteLine(data); ``` - Parallel Tasks: ```c# Task<int> task1 = Task.Run(() => { /* compute */ return 1; }); Task<int> task2 = Task.Run(() => { /* compute */ return 2; }); await Task.WhenAll(task1, task2); int sum = task1.Result + task2.Result; ``` --- #### Topic 2: Inheritance **Inheritance:** Allows a class (child/derived) to inherit from another (parent/base), promoting code reuse. Use `: BaseClass`. ```c# public class ServiceNow { public string name { get; set; } public string assignment_group { get; set; } public string operational_unit { get; set; } public string cab_regime { get; set; } } public class Server : ServiceNow { public string SrvHWType { get; set; } public string ProductionStatus { get; set; } public string OSVersion { get; set; } } ``` --- **Expanded Code Examples:** - Inheritance Basics: ```c# public class Person { public string Name { get; set; } public Person(string name) { Name = name; } public virtual void Greet() // Virtual for overriding { Console.WriteLine($"Hello, I'm {Name}."); } } public class Student : Person { public int Grade { get; set; } public Student(string name, int grade) : base(name) // Call base constructor { Grade = grade; } public override void Greet() // Override { Console.WriteLine($"Hi, I'm {Name}, a student in grade {Grade}."); } } // Usage Person p = new Person("Bob"); p.Greet(); // Hello, I'm Bob. Student s = new Student("Alice", 10); s.Greet(); // Hi, I'm Alice, a student in grade 10. Person poly = new Student("Charlie", 12); // Polymorphism poly.Greet(); // Hi, I'm Charlie, a student in grade 12. (calls override) ``` --- #### Topic 5: Exception Handling **Detailed Lecture Notes:** Exceptions are runtime errors (e.g., divide by zero). Handle to prevent crashes. - **Try-Catch:** `try { code } catch (ExceptionType e) { handle } finally { always run }` - **Throw:** `throw new Exception("Message");` - Custom Exceptions: Derive from Exception. - Best Practices: Catch specific exceptions first, log details, don't swallow (ignore) exceptions. Common Types: ArgumentException, NullReferenceException, DivideByZeroException. **Expanded Code Examples:** - Basic Handling: ```c# try { Console.Write("Enter number: "); int num = int.Parse(Console.ReadLine()); int result = 10 / num; Console.WriteLine(result); } catch (Exception e) { Console.WriteLine($"Invalid input: {e.Message}"); } ``` --- ### Using databases **Using Sqlite:** ``` var db = new SqliteConnection("Data Source=databaseName.db"); ``` Add this package: Microsoft.Data.Sqlite **Using SQL Server:** ``` SqlConnectionStringBuilder builder = new SqlConnectionStringBuilder(); builder.DataSource = "my-application-sql.database.windows.net"; builder.UserID = "MyAppUser"; builder.InitialCatalog = "databaseName"; builder.TrustServerCertificate = true; builder.Password = File.ReadAllText("C:\\appl\\MyDatabase.txt"); var db = new SqlConnection(builder.ConnectionString); ``` Add this package: Microsoft.Data.SqlClient Then we have two options for the package used to query the database (ORM): **EF Core** or **Dapper**. (I only use Dapper) Add this package: Dapper --- ### Database Integration with Dapper Dapper, a lightweight micro-ORM (Object-Relational Mapper) that extends ADO.NET for efficient database interactions. Dapper is ideal for performance-critical apps, as it's faster than full ORMs like Entity Framework but still maps SQL results to C# objects. **Topics:** 1. Connecting to Databases (SQL Server/SQLite). 2. CRUD Operations (Create, Read, Update, Delete). 3. Querying with Parameters to Prevent SQL Injection. 4. Integrating Dapper into Razor Pages. **Code Example: Basic Dapper CRUD** ```c# using Microsoft.Data.Sqlite; using Dapper; var db = new SqliteConnection("Data Source=databaseName.db"); // create table db.Execute("Create table if not exists Employees (Name TEXT, Age INTEGER)"); // Insert db.Execute("INSERT INTO Employees (Name, Age) VALUES (@Name, @Age)", new { Name = "Bob", Age = 25 }); // Query var employees = db.Query<Employee>("SELECT * FROM Employees"); foreach (var emp in employees) { Console.WriteLine($"Name: {emp.Name}, age: {emp.Age}"); } // Query single row var employee = db.QueryFirstOrDefault<Employee>("SELECT * FROM Employees"); Console.WriteLine($"Single row: Name: {employee.Name}, age: {employee.Age}"); public record Employee(string Name, long Age); ``` --- #### Other examples Use multiple lines: ```c# db.Execute(@" CREATE TABLE IF NOT EXISTS Employees ( Id INTEGER PRIMARY KEY, Name TEXT NOT NULL, Age INTEGER, Department TEXT, Salary REAL )"); ``` ```c# db.Execute("INSERT INTO Employees (Name, Age, Department, Salary) VALUES (@Name, @Age, @Department, @Salary)", new { Name = "Alice", Age = 30, Department = "HR", Salary = 50000.0 }); ``` In-Memory DB for Testing: ```c# var db = new SqliteConnection("Data Source=:memory:"); ``` Update and delete: ```c# // Update db.Execute("UPDATE Employees SET Age = @Age WHERE Id = @Id", new { Age = 26, Id = newId }); // Delete db.Execute("DELETE FROM Employees WHERE Id = @Id", new { Id = newId }); ``` --- #### Topic 4: Querying with Parameters to Prevent SQL Injection SQL Injection: Attack via malicious input (e.g., ' OR '1'='1). Prevent by parameterizing—Dapper does this automatically with anon objects or DynamicParameters. - Syntax: @Param in SQL, match in object. Security: Always parameterize; validate inputs client-side too. **Expanded Code Examples:** - Parameterized Query with Join (assume Departments table): ```c# // Create Departments table for demo db.Execute("CREATE TABLE IF NOT EXISTS Departments (Id INTEGER PRIMARY KEY, Name TEXT)"); // Query with params and join var sql = @" SELECT e.*, d.Name as DeptName FROM Employees e INNER JOIN Departments d ON e.Department = d.Name WHERE e.Age > @MinAge AND e.Name LIKE @NamePattern"; var results = db.Query(sql, new { MinAge = 30, NamePattern = "%a%" }); // % for LIKE wildcard ``` --- ### Web developmenet Introduction to ASP.NET Core with Razor Pages Focus: Transition to web development. **Topics:** 1. Setting Up an ASP.NET Core Project. 2. Razor Pages Basics (Pages, Models, Handlers). 3. Routing and Layouts. 4. Forms and Data Binding. 5. Dependency Injection and Configuration. **Lecture Notes:** - Razor Pages as a simpler alternative to MVC for page-focused apps. - Create a new project: `dotnet new webapp -o MyApp`. - Explain page model with OnGet/OnPost handlers. --- ### ASP.NET Razor Pages Directory Structure & Getting Started #### Creating a New Razor Pages Application First, let's create a new Razor Pages project: ```bash mkdir MyWeb cd MyWeb dotnet new webapp ``` This creates a basic Razor Pages application with the standard directory structure. Here's the typical structure you'll see: ```text MyWweb/ ├── Pages/ │ ├── Shared/ │ │ ├── _Layout.cshtml │ │ └── _ViewImports.cshtml │ ├── _ViewStart.cshtml │ ├── Index.cshtml │ ├── Index.cshtml.cs │ ├── Privacy.cshtml │ └── Privacy.cshtml.cs ├── Properties/ │ └── launchSettings.json ├── wwwroot/ │ ├── css/ │ ├── js/ │ └── lib/ ├── appsettings.json ├── Program.cs └── MyRazorApp.csproj ``` --- ### Key Directories and Files: **`Pages/`** - The heart of your Razor Pages application - Contains all your Razor pages (.cshtml files) - Each page typically has two files: - `.cshtml` - The view (HTML + Razor syntax) - `.cshtml.cs` - The page model (C# code-behind) **`Pages/Shared/`** - Shared components and layouts - `_Layout.cshtml` - Master layout template - `_ViewImports.cshtml` - Global using statements and directives **`wwwroot/`** - Static web assets (CSS, JavaScript, images) - Everything here is publicly accessible via HTTP **`Program.cs`** - Application entry point and configuration ### Understanding Page Routing Razor Pages uses convention-based routing: - `Pages/Index.cshtml` → `/` or `/Index` - `Pages/About.cshtml` → `/About` - `Pages/Products/Details.cshtml` → `/Products/Details` --- #### The Layout System Overview Razor Pages uses a hierarchical layout system where individual pages are "injected" into a master template. This allows you to define common HTML structure once and reuse it across all pages. 1. Request comes in for /Contact 2. ASP.NET finds Pages/Contact.cshtml 3. Contact.cshtml specifies it wants to use _Layout.cshtml 4. The layout wraps around the page content 5. Final HTML is sent to browser Pages/Shared/_Layout.cshtml: This file contains the common HTML structure that includs the css, javascript files and menu line at the top of the page that all pages will use. In the midle of this file we find this part that says where the page content goes: ```html <main class="container"> @RenderBody() <!-- This is where page content goes --> </main> ``` Pages/_ViewStart.cshtml: ```html @{ Layout = "_Layout"; } ``` This file runs before every page in the Pages folder, automatically setting the layout for all pages. #### Key Concepts 1. **Convention over Configuration** - File location determines routing 2. **Page Models** - Separate logic from presentation 3. **Handlers** - OnGet(), OnPost(), OnPostDelete(), etc. 4. **Model Binding** - Automatically map form data to properties This structure makes it easy to organize and scale web applications while keeping related code together in logical groupings. --- **Code Example: Simple Razor Page** - Index.cshtml.cs (Page Model): ```c# using Microsoft.AspNetCore.Mvc.RazorPages; namespace MyApp.Pages { public class IndexModel : PageModel { public string Message { get; set; } public void OnGet() { Message = "Welcome to Razor Pages!"; } } } ``` - Index.cshtml: ```html @page @model IndexModel <h1>@Model.Message</h1> ``` When we use the `dotnet new webapp` template to create a new web application, the template using [Bootstrap](https://getbootstrap.com/) as the library for css styling. --- #### Creating our weather forecast application From a new empty directory: `dotnet new webapp` We move our code from our first console applicaiton into the file `Services/Met.cs` Instead of having the code at top level without being in a class we need to put the code into a class. Here we create a class that have one method (function) and several data object definitions. This function is static, will return to variables and require two input parameters: ```c# using RestSharp; using Newtonsoft.Json; public class Met { public static (WeatherForecast, string) GetForecast(string lon, string lat) { var client = new RestClient("https://api.met.no"); var request = new RestRequest("/weatherapi/locationforecast/2.0/compact"); request.AddHeader("User-Agent", "peweWeatherApp/1.0"); request.AddParameter("lat", lat); request.AddParameter("lon", lon); var response = client.ExecuteGetAsync(request).Result; if (response.IsSuccessful) { var weatherData = JsonConvert.DeserializeObject<WeatherForecast>(response.Content); return (weatherData, "success"); } return (null, $"Error: {response.StatusCode}"); } public record WeatherForecast(Properties properties); public record Properties(List<Timeseries> timeseries); public record Timeseries(DateTime time, Data data); public record Data(Instant instant, ForecastPeriod next_12_hours, ForecastPeriod next_1_hours, ForecastPeriod next_6_hours); public record Instant(InstantDetails details); public record InstantDetails(double air_temperature); public record ForecastPeriod(Summary summary); public record Summary(string symbol_code); } ``` --- Content of `Pages/Index.cshtml.cs` The OnGet method is the first part that will be executed when the Get request comes from the browser. (after Program.cs is executed) ```c# using Microsoft.AspNetCore.Mvc; using Microsoft.AspNetCore.Mvc.RazorPages; namespace web2.Pages; public class IndexModel : PageModel { public Met.WeatherForecast weatherData; public string status; public string lon = "5.721425"; public string lat = "58.850060"; public void OnGet() { (weatherData, status) = Met.GetForecast(lon, lat); } } ``` For this application we need to add these packages: ```bash dotnet add package RestSharp dotnet add package Newtonsoft.Json ``` --- Content in file Pages/Index.cshtml ```html @page @model IndexModel @{ ViewData["Title"] = "Home page"; } <div class="text-center"> <h1 class="display-4">Welcome</h1> <h1 class="display-4" style="background-color:rebeccapurple; color:white; padding:20px; margin:50px">@User.Identity?.Name</h1> <p>Learn about <a href="https://learn.microsoft.com/aspnet/core">building Web apps with ASP.NET Core</a>.</p> </div> @if(Model.status == "success") { <h3>Weather forecast for position @Model.lon, @Model.lat <a href="https://www.google.com/maps/place/@Model.lat,@Model.lon">show in Google maps</a></h3> <table class="table"> <tr><th>Time</th><th>Temperature</th><th>Next hour</th><th>Next 6 hours</th><th>Next 12 hours</th></tr> @foreach (var weather in Model.weatherData.properties.timeseries) { <tr> <td>@weather.time.ToLocalTime()</td> <td>@weather.data.instant.details.air_temperature °C</td> <td>@weather.data.next_1_hours?.summary?.symbol_code</td> <td>@weather.data.next_6_hours?.summary?.symbol_code</td> <td>@weather.data.next_12_hours?.summary?.symbol_code</td> </tr> } </table> } else { <h3>Error retriving weather forecast: @Model.status</h3> } ``` --- #### Adding use of database to the application Now we want to let the user store locations in a database and then the user can choose a location from a list of stored locations. In the Program.cs file add this line: `builder.Services.AddScoped<Database>();` just after `builder.Services.AddRazorPages();` At the beginning of the file, add anew `using` statement to the list: `using web2.Services;` For database access we need these two packages installed: ```bash dotnet add package Microsoft.Data.Sqlite dotnet add package Dapper ``` Create the database: ```bash sqlite3 locations.db "CREATE TABLE Locations (id INTEGER PRIMARY KEY, Name TEXT, Latitude TEXT, Longitude TEXT)" ``` (On Windows use `sqlite3.exe`, this utility can be downloaded from sqlite.org. Look for `download` and then `Command-line tools for Windows x64`) --- Add a new file in the Serivces directory: Database.cs ```c# using Microsoft.Data.Sqlite; using System.Data.Common; namespace web2.Services { public class Database { private readonly DbConnection _connection; public Database(IConfiguration config) { _connection = new SqliteConnection("Data Source=locations.db"); } public DbConnection GetDapper() { return _connection; } } } ``` --- We need to update [Index.cshtml](fullIndex.html) and [Index.cshtml.cs](fullIndexCs.html) I addition to these files you should have these two files under the Services directory: `Met.cs` `Database.cs` Have updated the Program.cs, and added these packages: ```bash dotnet add package RestSharp dotnet add package Newtonsoft.Json dotnet add package Dapper dotnet add package Microsoft.Data.Sqlite ``` and adjusted the `<Nullable>disable</Nullable>` line in the .csproj file. and have created the database. Here is a version after using AI to add edit and delete functionality for the locations: [Index.cshtml](fullIndexv2.html) and [Index.cshtml.cs](fullIndexCsv2.html) AI can be used in Visual Studio and Visual Studio Code in the 'GitHub Copilot Chat' section. In this example I have used `Ask` mode with this promt: `On this page the users should be able to edit the locations and delete existing locations.` --- **If you plan to use Entra-Id authentication as explained later.** When runing on our training server we need to update the Properties/launchSettings.json to use you assigned port number. If you are running the application on your PC with Visual Studio, Code or Command line, then use 7074 for https. --- ### Usefull documentation Razor syntax in .cshtml files: [Razor syntax documentation](https://learn.microsoft.com/en-us/aspnet/core/mvc/views/razor?view=aspnetcore-9.0) Learn HTML and CSS: [HTML & CSS for Absolute Beginners](https://www.youtube.com/@KevinPowell/courses) Bootstrap 5: [Botstrap 5 documentation](https://getbootstrap.com/docs/5.3/getting-started/introduction/) --- ### Running your web application and expose it to internet In your web application folder, edit the file **Properties/launchSettings.json** Under profiles/http/applicationUrl change the port number to the number that matches your shortname here: ```text pewe.wersland.net localhost:6010 gfj.wersland.net localhost:6011 glune.wersland.net localhost:6012 jekar.wersland.net localhost:6013 jkfra.wersland.net localhost:6014 johih.wersland.net localhost:6015 jonome.wersland.net localhost:6016 kjebu.wersland.net localhost:6017 knpo.wersland.net localhost:6018 lg.wersland.net localhost:6019 lomla.wersland.net localhost:6020 maabe.wersland.net localhost:6021 pja.wersland.net localhost:6022 ronskj.wersland.net localhost:6023 toolb.wersland.net localhost:6024 trhs.wersland.net localhost:6025 vlv.wersland.net localhost:6026 ggup.wersland.net localhost:6027 kebe.wersland.net localhost:6028 msoli.wersland.net localhost:6029 taqs.wersland.net localhost:6030 abreh.wersland.net localhost:6031 ``` After you have updated your launshSettings.json you can start your application: ```bash dotnet run ``` Then you can use your browser and go to the URL assigned to you as listed above. Https certificate is automatically created. Later we will learn to set up the application as a service so it will stay running after you have logged off and start up automatically when the server start. --- ### Using a Reverse Proxy to expose web applications. To use a Reverse Proxy, we get two important functions: 1. You can run and expose several web applications on the same server. 2. They normally have built in support for automatically handling https certificates. #### On Linux: Here we use `caddy` as Reverse Proxy. The configuration is `/etc/caddy/Caddyfile` To install caddy on your own server: [caddy install instruction](https://caddyserver.com/docs/install#debian-ubuntu-raspbian) Caddy will automatically request https certificates from Let's Encrypt and install it. Caddy will also automatically renew the certificate before it expires. The requirement is that the web application is available open on internet and that you have DNS entry that points to the server. If you have your own DNS domain, you can create a DNS entry with a name you prefer, and we then update the Caddyfile with your DNS name. #### On Windows Server: IIS is the Reverse Proxy and will handle these two functions. For https certificates, you must request them your self and install them in Windows and then use them in IIS. --- ### Entra-ID authentication In the Program.cs file: ```c# using Microsoft.AspNetCore.Authentication.OpenIdConnect; using Microsoft.AspNetCore.HttpOverrides; using Microsoft.Identity.Web; var builder = WebApplication.CreateBuilder(args); // Add services to the container. builder.Services.AddAuthentication(OpenIdConnectDefaults.AuthenticationScheme) .AddMicrosoftIdentityWebApp(builder.Configuration.GetSection("EntraId")); builder.Services.AddAuthorization(options => { // By default, all incoming requests will be authorized according to the default policy. options.FallbackPolicy = options.DefaultPolicy; }); builder.Services.AddSession(options => { options.IdleTimeout = TimeSpan.FromMinutes(40); options.Cookie.HttpOnly = true; }); builder.Services.AddHttpContextAccessor(); builder.Services.AddRazorPages(); //builder.Services.AddScoped<Database>(); builder.Services.Configure<ForwardedHeadersOptions>(options => // Use when you have a reverse proxy in front of the application { options.ForwardedHeaders = ForwardedHeaders.XForwardedFor | ForwardedHeaders.XForwardedProto; }); ``` These program lines should go before this line: ```c# var app = builder.Build(); ``` --- And still in the Program.cd file: ```bash // this next is to inform the EntraID authentication solution that it is behind a reverse proxy app.Use(next => context => { if (string.Equals(context.Request.Headers["X-Forwarded-Proto"], "https", StringComparison.OrdinalIgnoreCase)) { context.Request.Scheme = "https"; } return next(context); }); app.UseRouting(); app.UseAuthentication(); app.UseAuthorization(); ``` The lines `app.UseRouting();` and `app.UseAuthorization();` should normally be there from before. Add this package to the project: ```bash dotnet add package Microsoft.Identity.Web ``` Add this to the `appsettings.json` file with a valid TenantId and ClientId: ```json "EntraId": { "Instance": "https://login.microsoftonline.com/", "TenantId": "2345-6789-xxxx", "ClientId": "aaaa-bbbb-cccc-dddd-eeee", "CallbackPath": "/signin-oidc" } ``` --- Now you can display the login name of the user in `Pages/Index.cshtml`: ```html <h2 class="display-4">@User.Identity?.Name</h2> ``` You can find this `App registration` in portal.azure.com by searching for `peweTesting`. When runing on our training server we need to update the Properties/launchSettings.json to use you assigned port number. If you are running the application on your PC with Visual Studio, Code or Command line, then use 7074 for https. --- #### Explaining more of ASP.NET web application The wwwroot folder is a special folder within the web application. It is the web root directory and houses static files. By virtue of being the web root directory, wwwroot is configured to allow its contents to be browsed directly. It is the correct location for stylesheets, JavaScript files, images, and other content that doesn’t require any processing before it is downloaded to the browser. **Create a new page for our application:** ```bash dotnet new page MyPage ``` Add it to the menu in _Shared/_Layout.cshtml. --- ## Create an API web application Here we will create an application that will expose REST api endpoints. ```bash mkdir api1 cd api1 dotnet new web ``` What we will get is this in Program.cs: ```c# var builder = WebApplication.CreateBuilder(args); var app = builder.Build(); app.MapGet("/", () => "Hello World!"); app.Run(); ``` --- We create a database to use in our application: ```bash sqlite3 myDatabase.db "Create table myList (id INTEGER PRIMARY KEY, Name TEXT, Value TEXT)" sqlite3 myDatabase.db "Insert into myList (Name, Value) Values ('Zip', 'Sceen')" sqlite3 myDatabase.db "Insert into myList (Name, Value) Values ('Testing', 'Success')" ``` Add packages: ```bash dotnet add package Microsoft.Data.Sqlite dotnet add package Dapper ``` --- Update Program.cs with this content: ```c# using Microsoft.Data.Sqlite; using System.Data.Common; using Dapper; var builder = WebApplication.CreateBuilder(args); builder.Services.AddScoped<DatabaseConnection>(); var app = builder.Build(); app.MapGet("/", (DatabaseConnection _connection) => { var db = _connection.GetDapper(); var list = db.Query("Select * from myList"); return Results.Ok(list); }); app.MapPost("/", (MyData myData, DatabaseConnection _connection) => { var db = _connection.GetDapper(); db.Execute("Insert into myList (Name, Value) values (@Name, @Value)", new { myData.Name, myData.Value}); return Results.Created(); }); app.Run(); public record MyData (string Name, string Value); public class DatabaseConnection { private readonly DbConnection _connection; public DatabaseConnection() { _connection = new SqliteConnection("Data Source=myDatabase.db"); } public DbConnection GetDapper() { return _connection; } } ``` --- Test the API: Using POST request to add data to the database: ```bash curl -X POST http://localhost:5166 \ -H "Content-Type: application/json" \ -d '{"Name": "John Doe", "Value": "Person"}' ``` Using GET request to list all content from the database table: ```bash curl -X GET http://localhost:5166 ``` --- ## Deployment Below, I'll describe step-by-step processes for deploying C# and ASP.NET applications to these common targets: Linux (focusing on ASP.NET Core, which is cross-platform), and IIS (on Windows Server). Here, we're working with ASP.NET Core for modern cross-platform compatibility. ### 1. Deploying to Linux (e.g., Debian Linux Server) ASP.NET Core runs natively on Linux, making it ideal for cloud VMs or containers. We'll cover a basic self-hosted deployment using Kestrel (the default web server) and systemd for managing the app as a service. For containerized apps, Docker is a great option—I'll touch on that briefly. #### Prerequisites - .NET SDK installed on your development machine. - A Linux server (e.g., Debian with SSH access). - Install .NET runtime or sdk on the Linux server. - Your ASP.NET Core app. --- #### Steps 1. **Publish the App Locally**: - In Visual Studio: Right-click your project > Publish > Folder (target a local folder). - Or via CLI: Navigate to your project directory and run: ```bash dotnet publish -c "Release" -o "bin/publish" ``` This creates a self-contained publish folder. You can then run the web application: ```bash bin/publish/myapp --urls=http://localhost:6010 ``` 2. **Transfer Files to Linux**: - If you develope on your PC and run on your Linux server: On your PC: ```bash scp -r C:\Appl\Git\MyWeb\bin\Release\net9.0\publish pewe@4.177.20.49:/home/pewe/MyWeb ``` On your Linux server: ```bash chmod +x /home/pewe/MyWeb ``` Nex page will explain how to set up the application as a service so it will stay running after you have logged off and start up automatically when the server start. --- **Set Up as a Service**: - Create a systemd service file at `/etc/systemd/system/AspNet-shortname.service`: ```ini [Unit] Description=Asp.Net Core app created by <My full name> [Service] WorkingDirectory=/home/shortname/appDir/bin/publish ExecStart=/home/shortname/appDir/bin/publish/MyApp --urls=http://0.0.0.0:6010 Restart=always # Restart service after 10 seconds if the dotnet service crashes: RestartSec=10 KillSignal=SIGINT SyslogIdentifier=dotnet-myapp-shortname User=root Environment=ASPNETCORE_ENVIRONMENT=Production Environment=DOTNET_PRINT_TELEMETRY_MESSAGE=false [Install] WantedBy=multi-user.target ``` Replace `shortname` with your shortname, `appDir` with the directory name for your app, `MyApp` with the app's executable, `6010` with your port number. You need admin rights to create and edit files at this location. Therefor use `sudo micro /etc/systemd/system/AspNetShortname.service` - Reload systemd, start, and enable the service: ```bash sudo systemctl daemon-reload sudo systemctl start AspNet-shortname sudo systemctl enable AspNet-shortname ``` **Test and Monitor**: - Check status: `sudo systemctl status AspNet-shortname`. - Logs: `sudo journalctl -u AspNet-shortname`. --- ### Create a collection of .NET applications (solution) An application or IT solution often contain a collection of separate applications. You may have one web application and a REST api application and multiple command line programs. In these cases we group them together in a .NET Solution. Each of the single applications is then reffered to as `projects`. A solution file lists the projects that contain in the solution. Each project is a subfolder in the solution folder. It is the solution folder that represent the root folder for the git repository. In the solution folder: ```bash dotnet new sln dotnet new webapp -o WebApp dotnet sln add WebApp/WebApp.csproj ``` From .NET 10 a new solution file format is used. To migrate to the new format: ```bash dotnet sln migrate ``` --- ### Git Before creating a Git repo for your application, consider if you should create a 'solution' that holds several .NET programs and then have the solution to become a Git repo. Normally a web application also needs to have som console applicaiton supporting imports or exports or other utilities as part of the application. ```bash dotnet new gitignore ``` --- ### 2. Deploying to IIS (Windows Server) #### Prerequisites - Windows Server 2019+ with IIS installed (via Server Manager > Add Roles > Web Server (IIS)). - Install `.NET Hosting Bundle` (download from dotnet.microsoft.com/en-us/download/dotnet). Click on the link for tha latest .NET version. Look for the 'ASP.NET Core Runtime' heading and click on the link 'Hosting Bundle'. - Admin access. #### Steps 1. **Publish the App**: - Similar to above: `dotnet publish -c Release -o ./publish` - In Visual Studio Publish to a folder. 2. **Set Up IIS Site**: - Open IIS Manager. - Right-click Sites > Add Website: Name it, set physical path to your publish folder (e.g., `C:\inetpub\wwwroot\myapp`), binding (e.g., port 80), and host name. - Ensure the Application Pool uses "No Managed Code" (Core handles its own runtime). 3. **Deploy Files**: - Copy the publish folder to the site's physical path. 4. **Test and Monitor**: - Browse to `http://localhost` or the bound URL. - Error logs: Check Event Viewer. --- ### Patching .NET runtime and sdk Even though a new major version is released once a year in November, there are patches coming out approximately once a month that often contain security patches. - On Windows server: Download the 'Hosting Bundle' and install it. It will replace the previous minor version - On Linux: Patches will come with normal apt update/install - On PC with Visual Studio: Start 'Visual Studio Installer' and check for updates ---